This post contains affiliate links. If you buy something from one of our links we may earn a commission. Thanks
Learning how to repot indoor plants for beginners is your ticket to happier, healthier houseplants!
Notice your leafy friends looking a bit cramped or sluggish lately? Maybe you’re worried about giving them a new home without causing stress?
Don’t worry repotting is like giving your plants a spa day, and with this easy guide, you’ll be a repotting pro in no time!
How to Repot Indoor Plants for Beginners
Key Takeaways:
- How to Repot Indoor Plants for Beginners involves moving plants to larger containers with fresh soil.
- Select a pot 1-2 inches wider than the current one.
- Gently remove the plant, loosen roots, and place in new pot with fresh potting mix.
- Water thoroughly after repotting.
- This process provides more space for root growth and fresh nutrients.
1. How to Repot Indoor Plants for Beginners: 7 Easy Repotting Tips
Are your houseplants sending out SOS signals? Perhaps their roots are poking through drainage holes, or they’re needing water more frequently than usual?
Many beginner plant parents feel nervous about repotting, but I promise it’s simpler than you think.
Don’t worry – repotting is one of the most rewarding parts of plant care, giving your green friends the space and nutrients they need to thrive.
Follow along with this beginner-friendly guide, and you’ll master the art of repotting in no time!
2. Why Repot Indoor Plants?
Repotting indoor plants involves moving plants to larger containers with fresh soil.
This process is essential for plant health, providing more space for root growth and fresh nutrients.
Signs plants need repotting include roots growing through drainage holes, slowed growth, or soil drying out quickly.
How Often to Repot
Repotting frequency varies by plant type and growing conditions. Fast-growing plants may need repotting every 12-18 months, while slow-growing plants might only need repotting every 2-3 years or longer.
Rather than following a strict timeline, watch for signs that your plant needs repotting, such as roots growing through drainage holes, soil drying out quickly, or slowed growth.
Plant type:
• Fast-growing plants like pothos or monstera may need repotting every 12-18 months
• Slow-growing plants like ZZ plants or snake plants might only need repotting every 2-3 years
• Cacti and succulents can often go several years between repotting
Growth stage:
• Young, actively growing plants typically need more frequent repotting
• Mature plants usually require less frequent repotting
Environmental conditions:
• Plants in optimal growing conditions (light, temperature, nutrients) grow faster and may need more frequent repotting
• Plants in less ideal conditions grow slower and need less frequent repotting
3. When to Repot Your Indoor Plants
Timing is everything when it comes to repotting. Here’s when to make the move:
Spring and Early Summer:
These seasons are like nature’s “go” signal for plant growth. Your plants will appreciate the fresh start!
Signs It’s Time to Repot:
- Roots peeking out of drainage holes (they’re saying “Help, we need more space!”)
- Soil drying out super quickly (roots are taking up too much space in the pot)
- Plant looking top-heavy or growing slowly (it might be root-bound)
4. Materials You’ll Need
Time to gear up for your repotting adventure! Here’s your shopping list:
- New pot (1-2 inches wider than the current one)
- Fresh potting mix
- Garden shears or scissors
- Watering can
- Trowel or gloves
5. Choosing the Best Potting Mix
Let’s talk about what your plant really wants to grow in! While you might be tempted to grab any potting soil off the shelf, choosing the right growing medium can make a huge difference in your plant’s health and growth.
Let’s explore your options and find out why a custom mix might be your best bet.
Traditional Potting Soil vs. Coco Coir with Perlite
Traditional Potting Soil:

• Ready to use out of the bag
• Contains beneficial microorganisms
• Often includes time-release fertilizers
• Can become compacted over time
• Usually contains peat moss, which isn’t sustainable
• May retain too much moisture
Coco Coir and Perlite Mix:

• Superior drainage and aeration
• Sustainable and eco-friendly
• Naturally resistant to fungal growth
• Excellent root development
• Better water retention while still draining well
• Lightweight and easy to work with
• Can be reused multiple times
• pH neutral and renewable resource
Creating the Perfect Mix
Here’s my recommended ratio for a potting mix:
• 60% coco coir
• 30% perlite
• 10% worm castings or compost for nutrients
Why This Mix Works So Well:
• Coco coir provides structure and moisture retention while still allowing proper drainage
• Perlite creates air pockets for root growth and prevents soil compaction
• Organic matter feeds beneficial microorganisms and provides slow-release nutrients
Pro tip: Choose a pot with drainage holes to prevent water-logged roots.
By using this custom mix, you’ll give your plant the perfect balance of moisture retention and drainage it needs to thrive.
Plus, you’ll be making an environmentally conscious choice by avoiding peat moss-based potting soils!
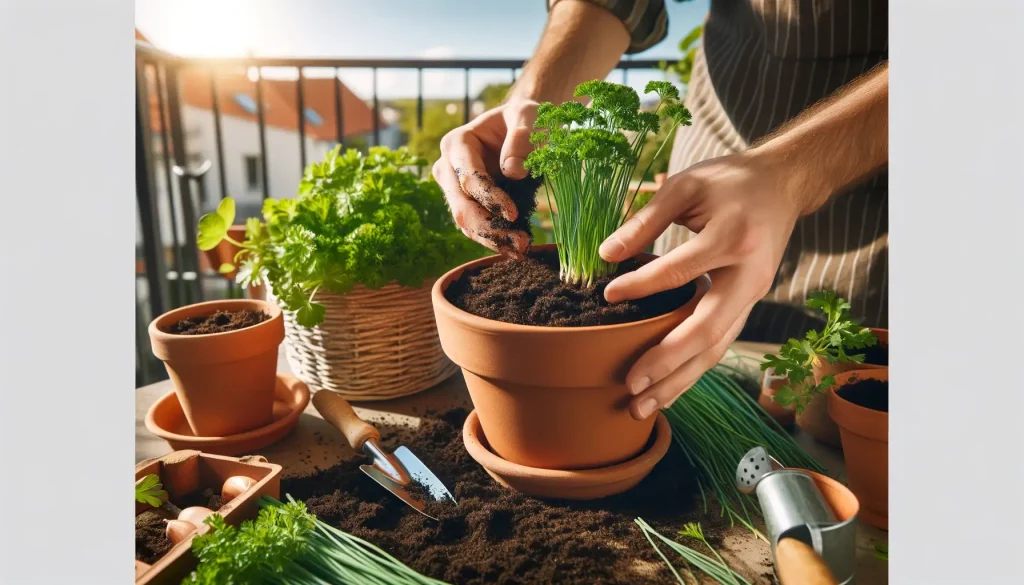
6. Step-by-Step Guide to Repotting
Ready to give your plant a new home? Let’s dive in!
6.1. Prepare the New Pot
Fill the bottom with fresh potting mix, leaving enough room for the root ball. Think of it as fluffing the pillow for your plant’s new bed!
6.2. Water the Plant
Give your plant a drink a day before repotting. It’s like a pre-move spa treatment!
6.3. Remove the Plant from the Old Pot
Gently turn the pot upside down and tap the edges. If it’s stubborn, use a butter knife to loosen it. Be patient – we’re not playing tug-of-war here!
6.4. Prune and Loosen the Roots
Inspect the roots, trimming any that look brown or mushy. Gently loosen the root ball – think of it as a root massage.
6.5. Place the Plant in the New Pot
Center your plant in its new home, making sure it’s slightly below the rim. Add fresh soil around it, patting gently. There’s no need to pack it down like you’re making a sandcastle!
6.6. Water Thoroughly
Give your newly repotted plant a good drink. But don’t drown it – we want happy roots, not soggy ones!
7. Post-Repotting Care
You’ve successfully moved your plant! Now, let’s make sure it settles in nicely:
Monitor Watering:
Your plant might be a bit thirsty at first but don’t overdo it. Check the soil moisture before watering.
Watch for Transplant Shock:
Don’t panic if your plant looks a bit droopy at first. It’s just adjusting to its new digs. Give it time and care, and it’ll perk up soon!
8. Conclusion: How to Repot Indoor Plants for Beginners
Giving Your Plants Room to Grow
As we’ve explored, repotting is a crucial part of indoor plant care that helps your green friends thrive.
By providing fresh soil and more space, you’re setting your plants up for healthy growth and vibrant life.
A Fresh Start for Your Indoor Jungle
Remember, repotting isn’t just about bigger pots – it’s about creating the best environment for your plants to flourish.
Whether you’re dealing with a cramped succulent or a sprawling monstera, these repotting skills will serve you well.
Growing Confidence with Every Repot
As you practice repotting, you’ll find your plant care skills growing alongside your green companions.
Don’t be afraid to get your hands dirty – every repotting experience is a learning opportunity!
Key Takeaways:
• Repot in spring or early summer when plants are actively growing
• Choose a pot 1-2 inches larger than the current one with good drainage
• Use fresh, well-draining potting mix for optimal plant health
• Water your plant a day before repotting to make the process easier
• Gently loosen and prune roots before placing in the new pot
• Water thoroughly after repotting, but avoid overwatering in the following days
• Monitor your plant for signs of transplant shock and adjust care as needed
• Remember, repotting is a normal part of plant care – don’t be intimidated!
By mastering the art of repotting, you’re giving your indoor plants the best chance to thrive and grow.
Happy repotting, and enjoy watching your refreshed plants flourish in their new homes!
🌱 Best Indoor Plants for Beginners
Just getting started with houseplants? These beginner-friendly guides will help you pick, grow, and care for indoor plants with confidence!
- 🌿 Best Indoor Plants for Beginners (Pillar Guide)
- 🐛 Common Indoor Plant Pests and How to Avoid Them
- 💨 Top Indoor Plants for Air Purification
- 🌱 How to Propagate Indoor Plants for Beginners
- 💧 Watering Tips for New Indoor Plant Owners
- 🌼 Easiest Indoor Plants to Grow
- 🪴 How to Choose the Right Indoor Pot for Beginners
- ⏳ Best Indoor Plants for Busy People
- 🌿 Beginner Guide to Indoor Plant Fertilizers
- 🏡 Indoor Plants for Small Spaces
- 😊 Best Indoor Plants for Improving Mood
- 💵 Budget-Friendly Indoor Plants for Beginners
- 🔄 How to Repot Indoor Plants for Beginners
- ❄️ Best Winter Indoor Plants for Beginners
- 🪴 Beginner-Friendly Hanging Indoor Plants
- 🐾 Pet-Friendly Indoor Plants for Beginners
- 🌵 Beginner-Friendly Succulents
- 💧 Best Indoor Plants for Low Humidity
- ⚠️ Common Mistakes Beginners Make with Indoor Plants
- 🌨️ Best Indoor Plants for Winter Months
- 🌸 Beginner-Friendly Indoor Flowering Plants
- ⚡ Indoor Plants with Fast Growth
- 🖤 Best Indoor Plants for Minimalist Decor
- 🌿 Best Indoor Plants to Start a Collection
- See all articles in our Best Indoor Plants for Beginners category
Related Content

Visit my Amazon Influencer Page for videos and gardening products Grow Your Own Garden